
Introduction
The easySMSOffice web application is designed to provide a complete Bulk Sms application for our customers whilst providing competative sms rates. The system provides for three license types (standard, advanced and premier) which determine the features available to the user.
The system user architecture has been designed with businesses in mind, where multiple users can be associated with a single sms account. The first user registering becomes the account holder, and can add additional users to the account. The origonal user is the only user capable of purchasing additional services and sms bundles.
We provide a comprehensive suite of submission services and these are documented below. In addition, our sms reporting features will allow you to track and analyse your sent sms, incoming sms and delivery reports.
Important
When contructing sms's you should make sure that you have identified yourself in the sms text and provided a mechanism for the recipient to opt out from receiving further sms's from you. The opt out mechanism is normally specified by added the following text 'Reply STOP to opt out.' to the end of all sms's sent.
Overview
The diagram below is the system at a glance. It shows the ways that sms's can be submitted to the system and the path they take through our system before being sent.
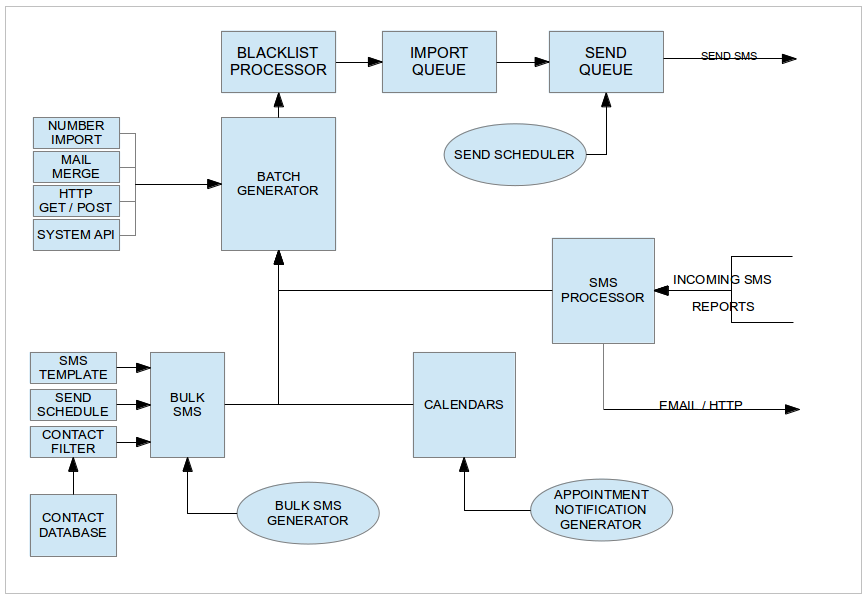
All sms sent in bulk (number list import, mail merge and bulk sms) are collated into batches. These batches are used for managing and tracking the set of sms's as a whole. Any individual sms (calendar reminders, quick sms, email to sms etc) are collated into daily Ad-Hoc batches.
The various submission services are described below.
Quick Sms
|
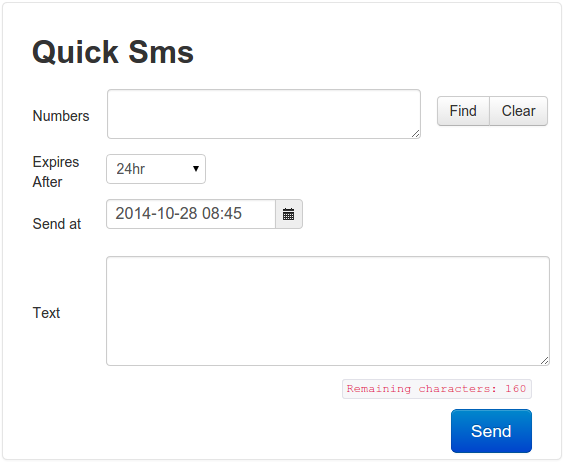
Provides a quick and simple method for sending a few sms's. This feature allows you to type in the numbers you wish to send to, the message text and schedule the send. The recipient numbers entered must be seperated using a semi-colon. A character counter shows you how many characters you have remaining based on your concatenation level (ie: 1sms, 2sms etc). For more info see Sms Concatenation The sms's are generated from the Quick SMS are added to the daily Ad-Hoc batch unless you have specified more than 50 numbers, in which case a seperate batch will be created for the sms. If you have an advanced or premier license, you will be able to search for recipients from any contact databases you have uploaded. See Contact Databases. |
|
Number List Import
|
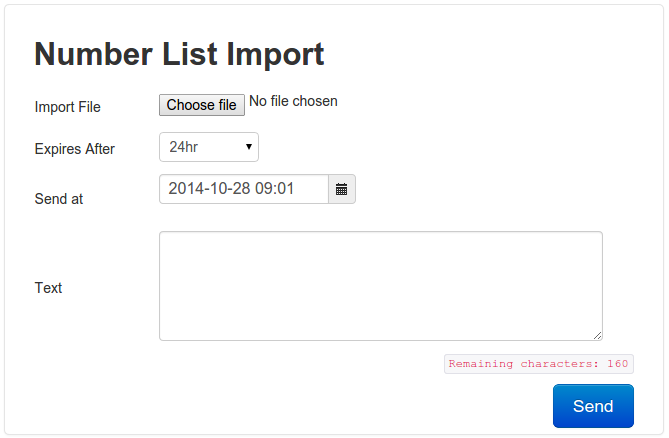
This feature allows you to send the same sms to a number of recipients using a Number List uploaded to our server. To create a number list on your PC, create a simple text file using an application such as NotePad. In the new text file, add your numbers, one number per line.
Once complete, save the file and it is ready for upload using the Number List import form show. Please note that the Number List file uploaded is not stored on our server and is automatically deleted once the sms generation is complete. |
|

Mail Merge Import
|
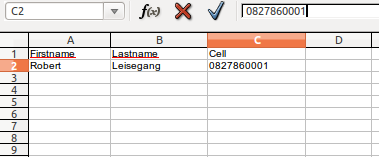
The Mail Merge function is based on generating sms's from a spreadsheet which is uploaded to our server. This function allows you to generate sms's that are personalized to each recipient as information from the spreadsheet can be inserted into each sms using field tags. An example of a simple spreadsheet is shown below. Note that the first row is the header row and has a column header for each row. One column must contain the recipient cell numbers. This column must be formated as text to prevent the leading zero from being dropped.
Our server supports importing of Microsoft Excel, and Libre Office speadsheets. Supported formats are: .CSV, .XLS, .XLSX, .ODS files. Once you have imported the file (Step 1), you can start building your sms (Step 2). First specify the column that contains the cell numbers. Then specify the date / time you wish to schedule the batch of sms for. If required you can filter the spreadsheet to only send to a subset of the recipients contained in the file. Below is a filter example where we only send to recipients whose firstname is not empty.
The last step is to enter the text you wish to send. Note that on the right of the sms text box is a form that allows you to insert any field from the spreadsheet into the text. The example shown will generate sms's with the firstname of the recipient inserted. Before the sms's are generated, the Mail Merge Review is displayed (Step 3) allowing you to check the sms that will be created. If all looks good, click on the Submit button to generate the sms. Please note that the Spreadsheet file uploaded is not stored on our server and is automatically deleted once the sms generation is complete. |
Step1: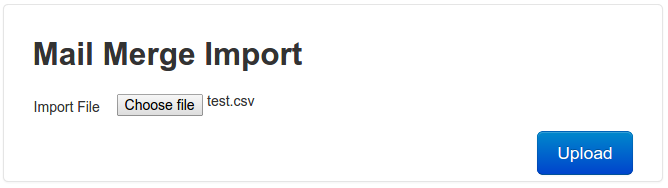
Step2: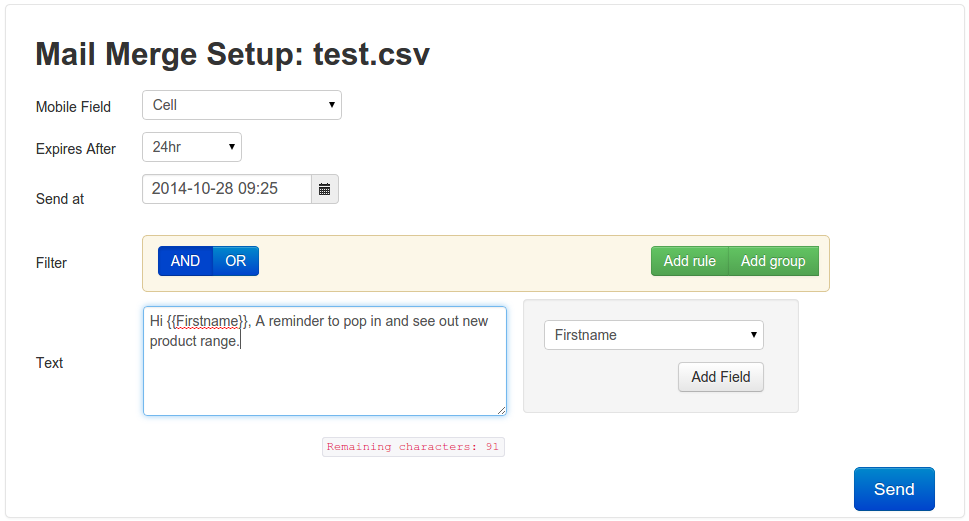
Step3: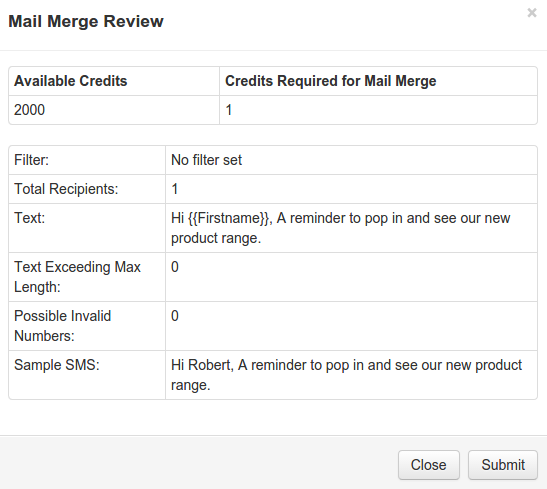
|

Bulk Sms
Introduction
The Bulk Sms Functionality is available to both Advanced and Premier licensed users. Advanced users are however restricted to a single Contact Database.
This feature allows users to upload a Spreadsheet which is converted into a database and stored on our server. The database in conjunction with Sms Templates, Schedules and Filters becomes the source for generated sms's.
As the database is now located on our server, the system can provide for automated scheduling and generation of sms's. For example you could setup a schedule to generate sms's from a contact database at 10:00am on the 25th of each month. These sms's would, for example, remind your customers of amounts outstanding. The system will automatically send you a reminder , one day before the next generation, to update the figures in the database.
Contact Databases
Introduction
Advanced and Premier users can upload and store their sms contact databases on our server. Advanced users are limited to a single database.
Method1: Create a Database Manually
|
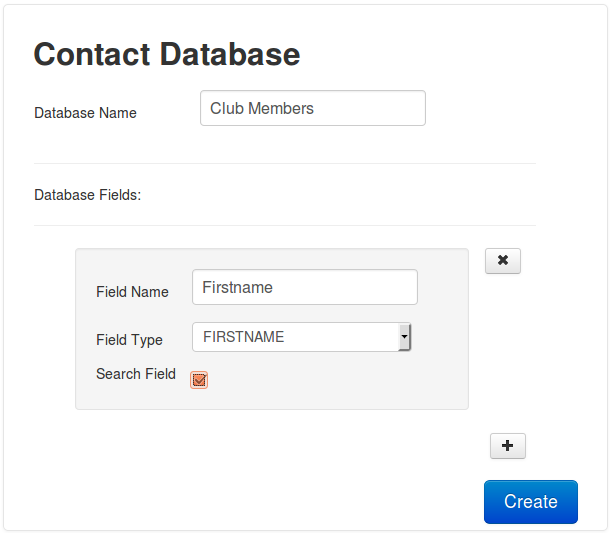
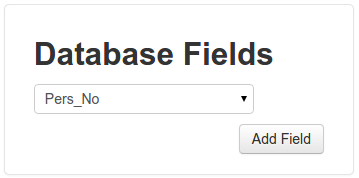
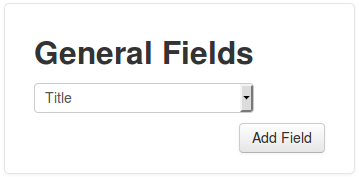
Blank databases can be created on our system using the 'Create Blank Database' function' Complete the form by entering a Database name and defining database fields. To add fields, simply click on the Continue to add your required fields before creating the database. Note:
|
|
Method2: Create a Database from a Spreadsheet
|
Contact Database can be created by uploading a spreadsheet containing your contact information. The spreadsheet is converted into a database and stored on our server. Our server supports importing of Microsoft Excel, and Libre Office speadsheets. Supported formats are: CSV, .XLS, .XLSX, .ODS files. An example of a simple spreadsheet is shown below. Note that the first row is the header row and has a column header for each row. One column must contain the recipient cell numbers. This column must be formated as text to prevent the leading zero from being dropped.
To import to a contact database (Step 1), type in the name of the database and select the spreadsheet you wish to import. Once imported, the processing form will be displayed (Step 2). Our processor will automatically attempt to determine the field (or column) types. Complete the process by correcting the types paying attention to the 'Mobile Number', 'Firstname' and 'Surname' field types. You can also tick any fields you wish to be displayed when viewing the database. Once configured, click on the Process button to complete the database setup. Please note that the system will automatically eliminate any duplicate contacts based on the mobile number field. |
Step1: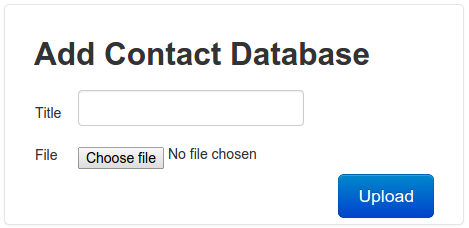
Step2: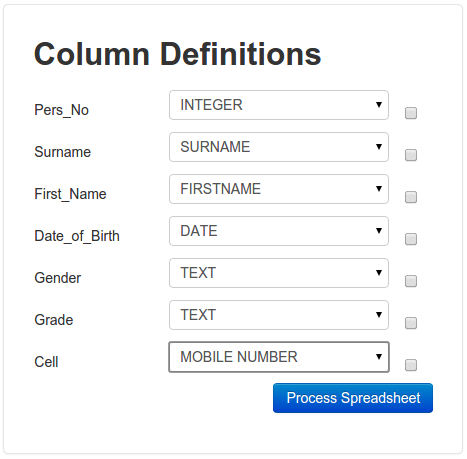
|
Contact Database Workgroups
|
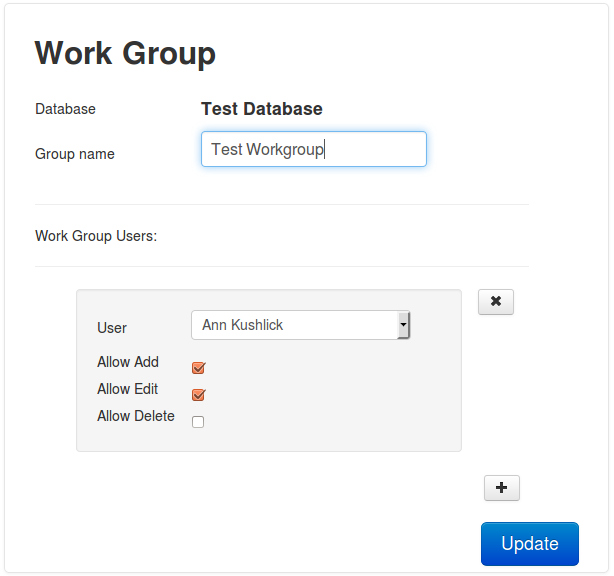
Premier users have the capability to create Contact Database Workgroups. Workgroups allow the owner of a Contact Database to share the database with other users linked to their Sms account. The linked users cannot however, modify the database structure or delete the database. When creating a Workgroup, the database owner can specify the users in the workgroup and control whether the added users can Add, Edit or Delete contacts within the shared database. The users that are added to the workgroup can then utilise the Contact Database and associated filters and templates to when generating Bulk Sms. To create or edit the Workgroup, click on the icon shown on the top of the Contact Database displayed. Click on the |
|
Note
In order for the recipient to be displayed when viewing sms's, you will have to specify at a minimum the following field types. FIRSTNAME or SURNAME and MOBILE NUMBER.
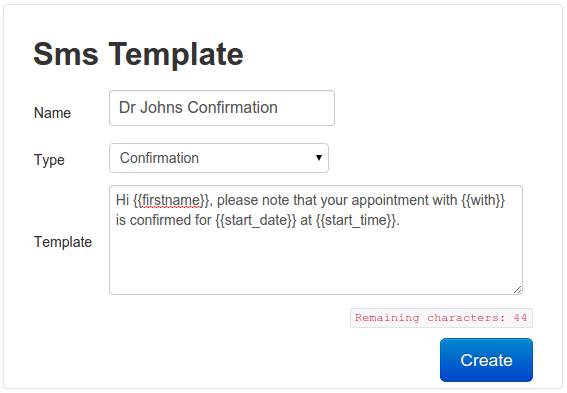
Sms Templates
|
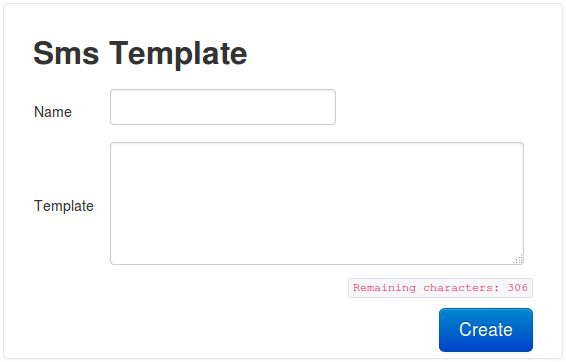
Sms Templates are used when generating Bulk Sms's. The template allows you to store sms texts that can be easily re-used when generating sms's. As Contact Database field tags can be inserted into Templates, they support personalised sms capability. Due to this, sms templates are always associated with a specific Contact Database. When createing a Template, you will first be prompted to select the Database you wish to associate the template with (Step 1). Select the relevant database from the dropdown list The Template form will then be displayed (Step 2). Add the name of your template and type in the required text. To personalize the text to the intended recipient, use the field form (shown below) to insert the required fields into the sms text.
|
Step1:
Step2: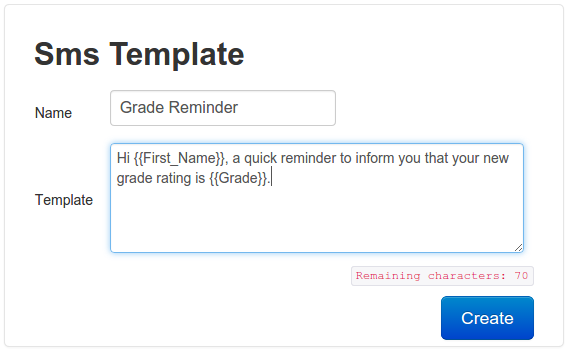
|
Contact Database Filters
|
When performing Bulk Sms's you may want to send to a subset of the recipients contained within your Contact Database. For example if you own a clothing shop and have a special on Ladies clothing, you would want to filter for females only. Contact Database Filters allow you to perform this function. As filters are defined using the database fields, each filter created is linked to a specific Contact Database. As with the Templates above, the first step when creating a Filter is to select the associated Contact Database (Step 1). You can then start defining your filter (Step 2). Filters are defined by rules on each field. Rules can be grouped together into rule groups. Rules and groups are linked together using 2 operators namely AND and OR. AND: means that both rules or groups must be true. So the example on the right will return contacts who either have grade = D OR (are female AND do not have empty cell numbers). Note in this case that contacts who have grade D can have empty cell numbers as the rules in groups are evaluated first. |
Step1: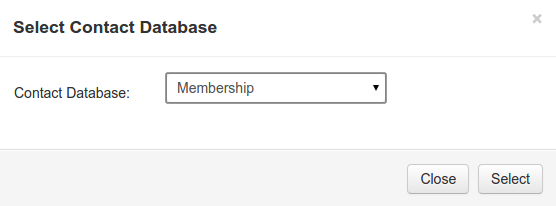
Step2: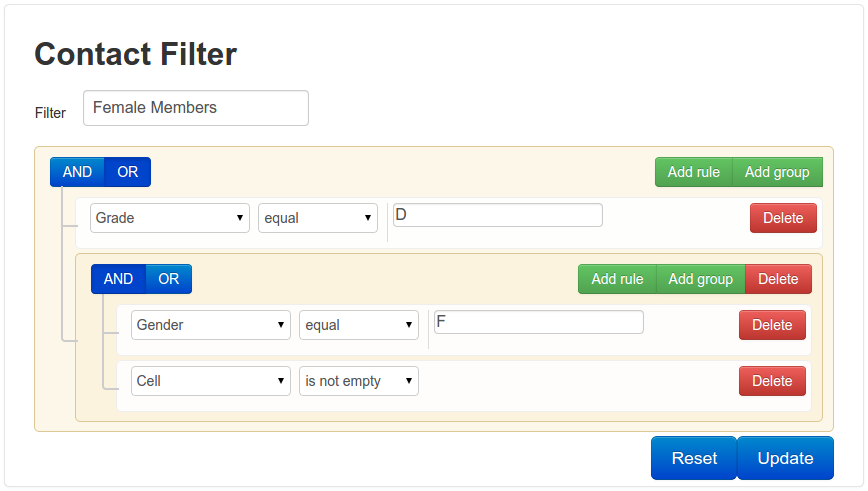
|
Bulk Sms Schedules
|
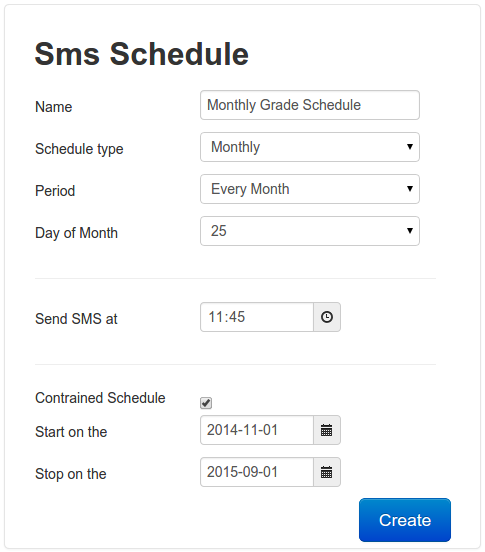
Schedules are used for automatically generated Bulk Sms's. They determine when a Bulk will generate a batch of sms's. When the Bulk is initially created, it will determine the first valid generation date from the schedule. Whever the Bulk is generated, the Bulk will also determine the next generation date from the assigned schedule. Once a valid date cannot be determined, Once Off, end of specific date list reached or end constraint date reached, the Bulk will be marked as complete and will no longer generate sms. Five types of schedules are available, namely Daily, Weekly (specify day of week), Monthly (specify day of month), Annually (specify month and day of month) and Specific Dates (specify list of specific dates) Schedules can also be constrained, if required, where the Bulk will only start generating after the start constraint date and will stop generating after the end constraint date. Please note that Bulks sms can be sent without an assigned schedule. In this case, the Bulk is treated as a 'once off' send. |
|
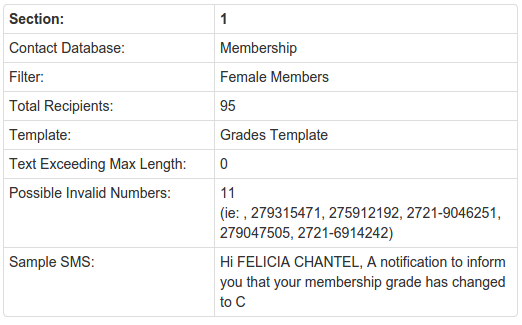
Creating Bulk Sms
|
As we have seen above, Bulk Sms are basically rules that determine when a batch of sms are created. The rules are comprised of a schedule, and then a number of sections each comprised of a contact database, a contact filter and a text template. By including bulk sections, you can send similar messages to a number of filtered contact databases within one bulk. Another example is where you send a promotion to your customers and add another section that informs staff of the promotion sent. To create a Bulk sms, give the bulk a name and assign the required schedule or leave as 'Once Off' if the message is only to be sent once. Click on the PLUS button to add a section. First assign the contact database for this section. Then assign a filter if required and the sms text template. The section is complete. Click on the Create button and the system will check the bulk for most obvious problems. Please review the bulk carefully before submitting the bulk sms. Please note that no sms are generated when you initially submit your bulk. Our system will however start to monitor the bulk schedule for sms generation. One hour prior to the next schedule send time, our system will generate the sms's specified by the associated contact database, template and filter. These sms's will be collated into a batch. At this point, the system will (in the case of repetative bulk schedules) update the next schedule time. If the new schedule time is past the end contraint time, the bulk will be marked as complete. If the schedule is valid, the system will also alert you by email, 24 hours prior to the next scheduled time, to inform you of the pending sms generation. If required, you can update the database to include updated data for the next generation. |
Create:
Review: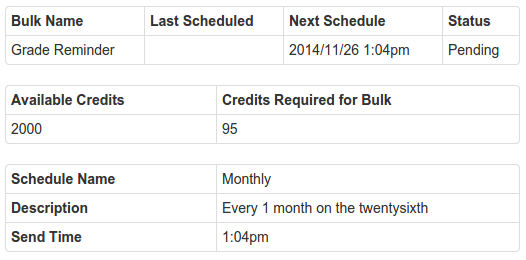
|
Appointment Manager
Introduction
The Appointment Manager is a flexible Calendar application that allows you to manage your appointments and more. It is linked to our sms application and can generate automated sms's for appointment confirmation, reschedule, reminder and cancellation sms's.
It is available to Advanced and Premier users. Advanced users are limited to a single calandar.
It has many applications, such as Appointment management for professionals such as Doctores, Dentists, etc or Golf Tee Off time reminders or simply sending Happy Birthday sms (using the repetative appointment feature.
For ease of use, you can also pre-import contacts from one of your Contact Databases (Premier Users only) so you do not need to capture attendee information when creating appointments.
Calendar Templates
|
Before you create a Calendar, you must create the appointment sms templates that will be used by the calendar when generating sms's. Four types of templates are available, namely Confirmation, Reminder, Reschedule and Cancellation. Create one for each type you intend to use. As shown below, you can insert information, using the Calendar Fields form, from the calendar event into the sms text. The following fields are available: Start Date, Start Time, End Date, End Time, With, Title, Initials, Firstname, Lastname
|
|

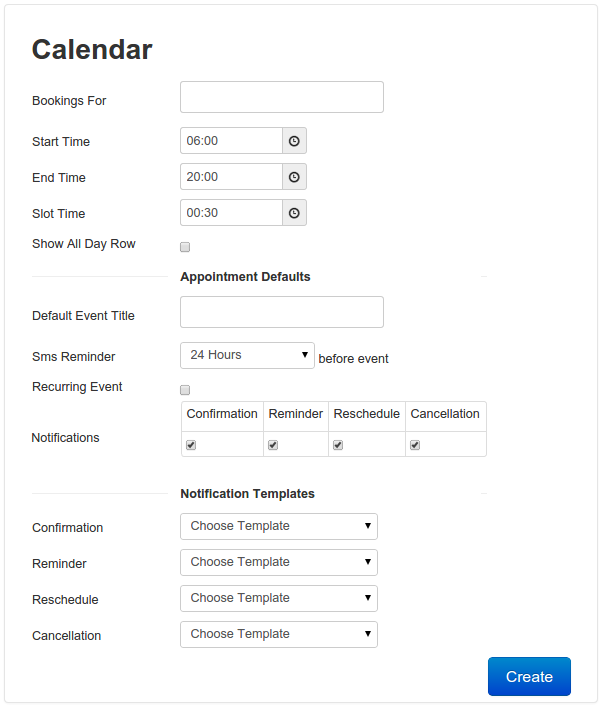
Creating a Calendar
|
Please note the following information below when creating a new calendar.
Once the calendar is created and you are adding appointments, the templates and default settings can be overwritten if required. |
|
Creating a Birthday Calendar
|
A Birthday Calendar can be created by reading birthday dates from one of your Contact Databases. You will of course had to have created a Contact Database that contains a (DATE) column for your contacts birthdays. Next create a REMINDER calendar template with the text you wish to send. When creating the calendar, you will first be prompted to select the Contact Database you wish to use to source the birthday dates. Next complete the form. The table below explains the fields required.
When you create the calendar, the system will first read the database and import all the contacts as calendar attendees. It will then create an appointment for each contact on their birthday. The system will then monitor the appointments, and send the birthday greeting sms when required. As it is setup as a recurring calendar, the system will automatically regenerate the appointments for the next year at the time that any birthday greetings are sent. |
Step 1: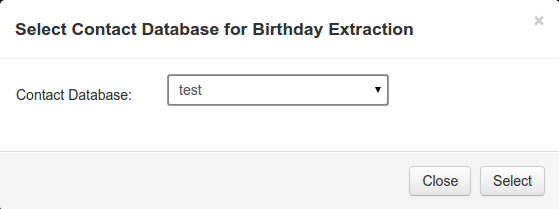
Step 2: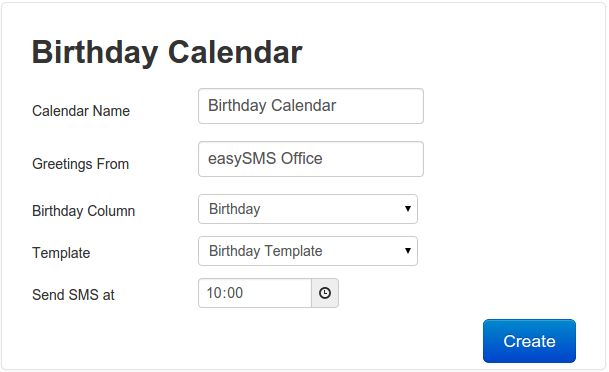
|
Using Calendars
 |
|
|
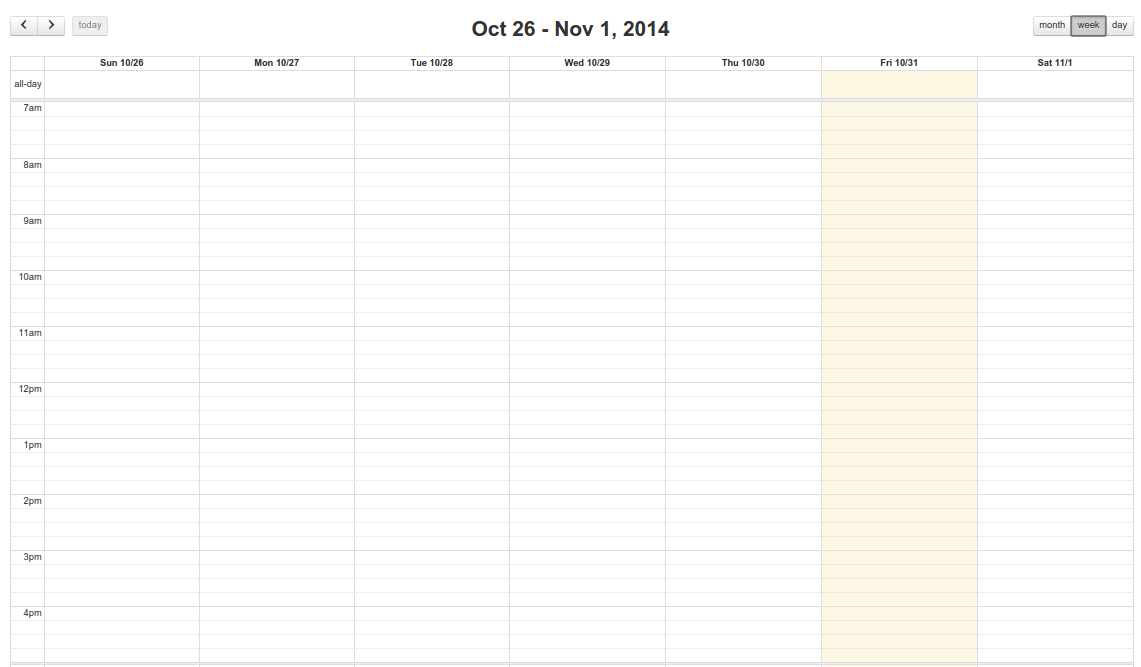
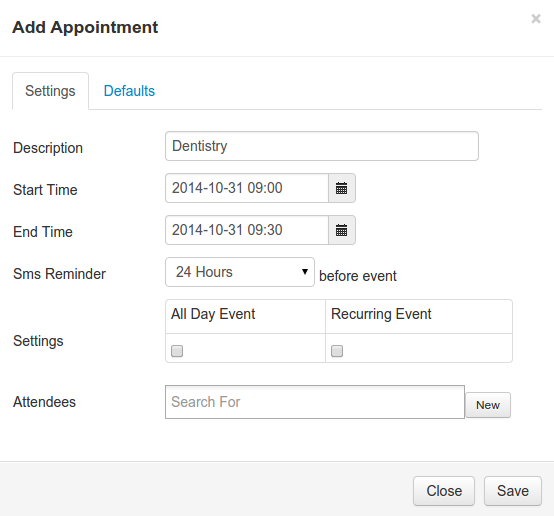
To Create a new appointment, click on a slot. Complete the Appointment Form displayed. To select longer periods, click and drag for the number of slots required. To Move an appointment, click and drag the appointment to the required slot. To Extend an appointment, click the resize icon at the bottom of the appointment and resize the appointment. To Edit or Cancel an appointment, click on the appointment. An edit form will be display to edit or cancel the appointment. Notification ChartNO NOTIFICATION CONFIRMED REMINDED RESCHEDULED CANCELLED |
|
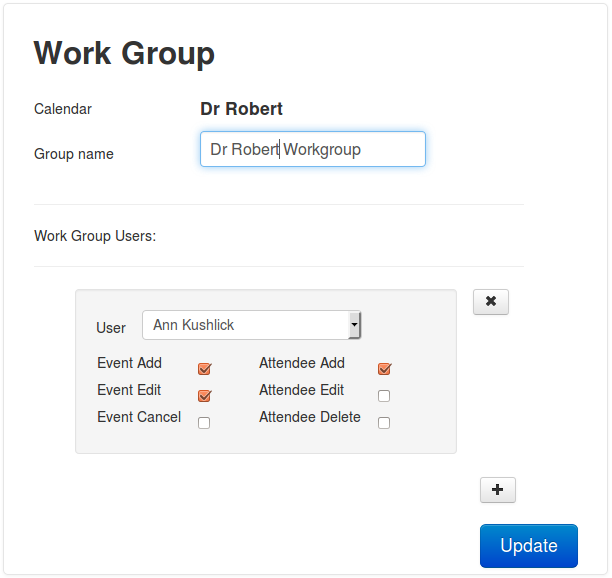
Calendar Workgroups
|
Premier users have the capability to create Calendar Workgroups. Workgroups allow the owner of a Calendar to share the calendar with other users linked to their Sms account. The linked users cannot however, modify the calendar setup or delete the calendar. When creating a Workgroup, the calendar owner can specify the users in the workgroup and control whether the added users can Add, Edit or Cancel appointments within the shared calendar. The users that are added to the workgroup can then utilise the shared Calendar. To create or edit the Workgroup, click on the Action menu item associated with the calendar to Manage the Workgroup. Click on the |
|
User Management
|
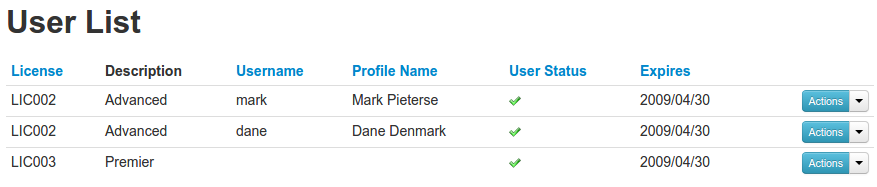
If you are the account holder on our SMS Platform (if you registered on our system and purchased an sms account), you have the ability to add more users to your account. The system is optimized for business use where you as the account holder can control and provision for the users linked to your account. You can add as many users as you require. All users linked to your account have seperate sms routing. For example if a user sends an sms and the recipient replies, the incoming sms is routed to the originating user only. All users are linked to the sms account credits. In order to add Users you first have to purchase Licenses using the Sms Shop. Once the licenses have been provisioned, you can create the user and link them to the purchased License. The list to the right shows the license/users currently linked to your account. The Action button on each item allows you to Assign and Enable or Disable the users. When you add a new user, the system will automatically send the user an email with their logon details. |

|
Sms Concatenation Setting
|
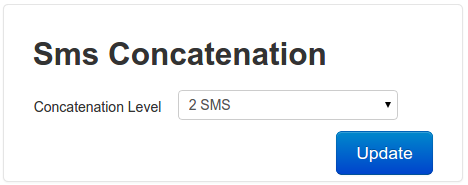
Sms's are text messages sent to a mobile device with a maximum length of 160 characters. It is possible to send sms's longer than 160 characters using sms concatenation. Longer sms's are essentially broken up into into a number of sms's and are charged as shown below:
Select the required level to limit the allowed maximum length of submitted sms. If you submit sms longer than the configured level, they will be failed! |
|
Credit Management
|
If you are the account holder on our SMS Platform (if you registered on our system and purchased an sms account), you have the ability to manage purchased credit bundles. SMS Credits are purchased as bundles using the Sms Shop. Sms Bundles are valid for 1 year from the date of purchase. A single sms (less or equal to 160 characters) costs 1 sms credit. Concatenated sms cost more than 1 credit. Sms sent to international destinations may also cost more than 1 credit. You will receive a Credit Warning Alert when your credits fall below the Credit Warning level assigned to any Credit Bundle. Using the Action button next to each listed bundle, click on the Edit Credit Bundle button to change the Warning Level. |
View Pools:
Set Warning Level: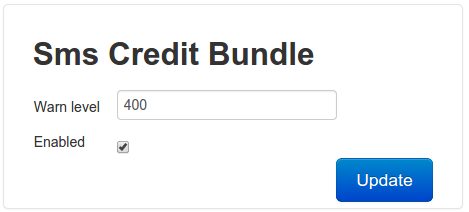
|
Send Control
|
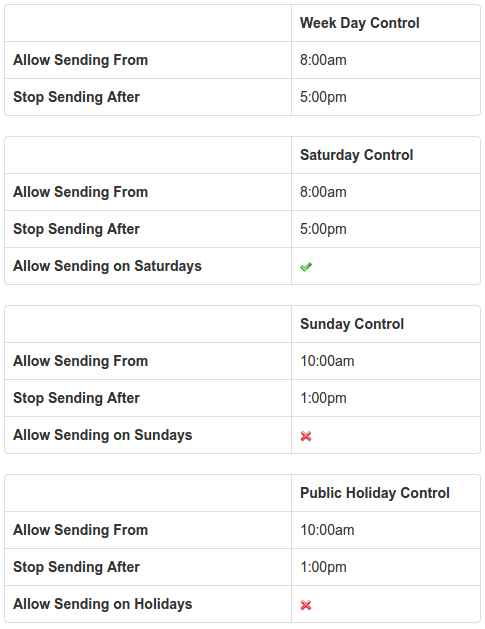
In order to comply with SMS Regulations, these settings allow you to control the times at which sms are sent. Please ensure you are aware of your country's regulations in this regard. The system will automatically adjust scheduled sms times to fit into the hours defined by these rules. If a schedule conflicts with the rules, the next open future time will be selected. Kindly note that Dev Squared Designs will not be responsible for any resulting action instituted by sms recipients relating to the scheduling of sms's. |
|
Alert Settings
|
The system can automatically alert you when certain events occur. This allows you to monitor the generation and delivery of sms's. In addition, you will be alerted for system warning and errors. Using the Action button next to each alert, you can change the delivery mode (email or sms) and the assocated recipient. You can also disable the alerts you do not wish to receive. |
Alert List: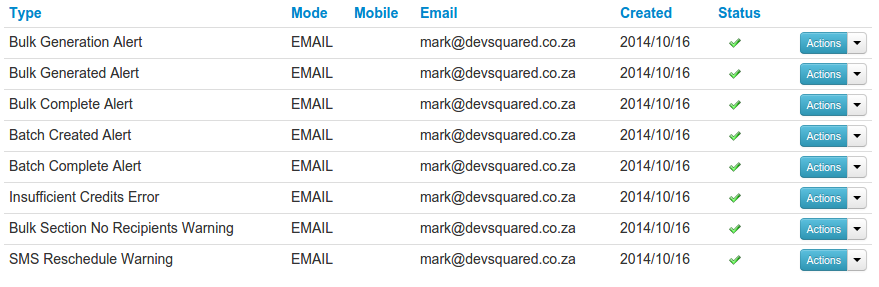
Editing Alerts: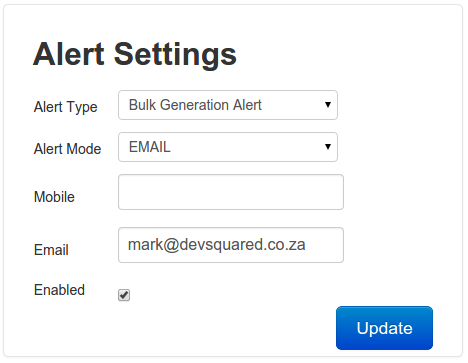
|
Sms Processors
|
If you are a Premier User, you can use SMS Processors to automatically process incoming sms, delivery reports and short codes. The following processors are available:
HTTP forwards are performed as a GET to the specified URL. The following parameters are supplied:
|

|
General Responder
IntroductionGeneral Responders are used to automatically generate replies to incoming or short code sms's. The reply generated is based on the configured keyword and phrase items. A Keyword is typically the first word in the incoming sms and is used to designate a short code campaign. A Phrase is following text (after the keyword) in the incoming sms and can be used to generate a specific response based on the keyword campaign. Each Responder can service multiple keywords each with its associated phrases. OperationThe Responder works by scanning incoming sms or short codes and searching for all defined keywords. If a keyword is not found, the responder replies with its default message. If a defined keyword is found, the responder scans the text for defined phrases. If a phrase is not identified, the responder replies with the response message defined in the keyword. If a defined phrase is found, the responder replies with the message defined in the detected phrase. Adding a ResponderTo Add a responder, first create the SMS Processor. Once created, Select Configure Processor option from the Action Dropdown associated with the Sms Processor (Fig1). The Responder Screen will be displayed. Click on the Create Responder button to create and configure the responder(Fig2). The Responder Select Database form will be displayed. Select the database you wish to associate the responder with (Fig3). Note: Each Responder must be associated with a Contact Database. This database becomes the master database. When a Responder is created, a responder database is automatically created with the fields defined in the master database. In addition, the following fields are added to the responder database: KEYWORD, PHRASE, CREATED_TIMESTAMP, LAST_SENT_TIMESTAMP, LAST_INCOMING_TIMESTAMP. This database can then be used for Bulk SMS based on incoming / shortcode sms received. Once the Primary Database is selected, add the Name of the Responder Database and define the default templates (used when a keyword is not matched) (Fig4). Note: Two templates are defined. When an incoming sms or shortcode is received, the responder tries to match the sender with a contact in the Primary database. If the person is found, then the Contact Found template is used. If not found, the Contact Not Found template is used. Data from the Primary database can be packed into the Contact Found Template. Adding Keywords and PhrasesOnce the Responder is configured, you can Add and View the associated Keywords and Phrases. Click on the View Keywords button to manage Keywords. Click on the View Phrases button to manage Phrases (Fig5a, Fig5b). Responder DatabaseWhen an incoming sms or short code is matched, the responder searches for the sender in the Primary Database. If the contact is found, its data is copied to or updated in the Responder Database. If not found, the MOBILE NUMBER, KEYWORD, PHRASE are just added to the Responder Database. |
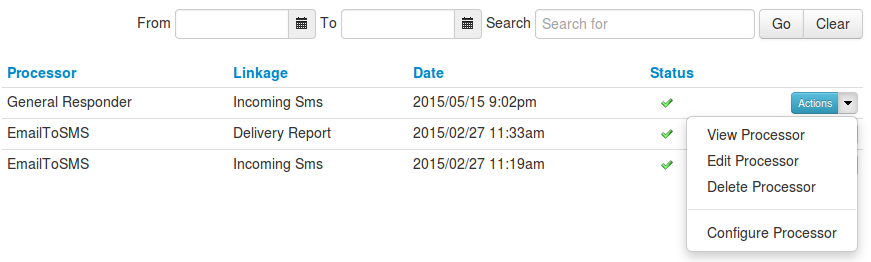
Fig1
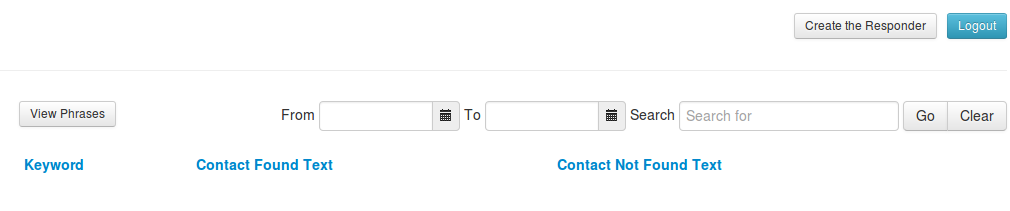
Fig2
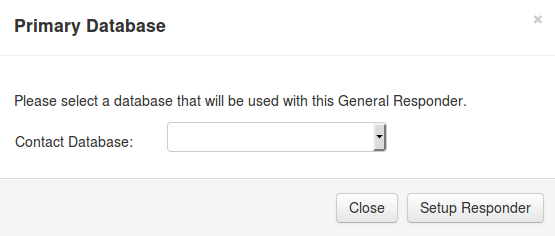
Fig3

Fig4
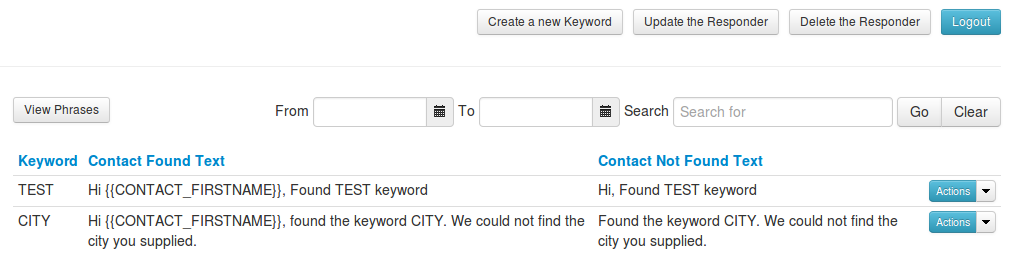
Fig5a
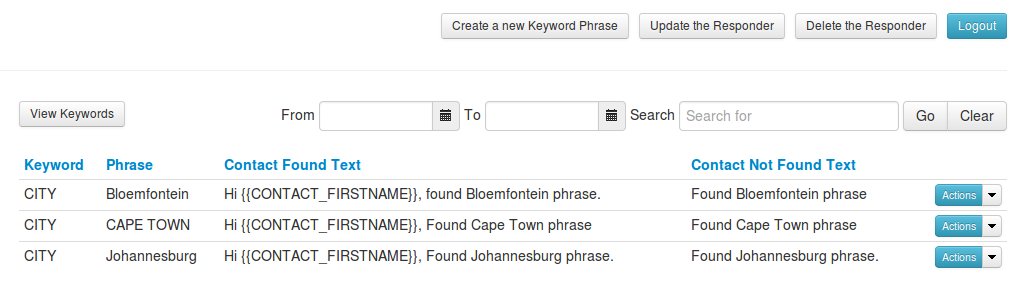
Fig5b
|
User Licenses
|
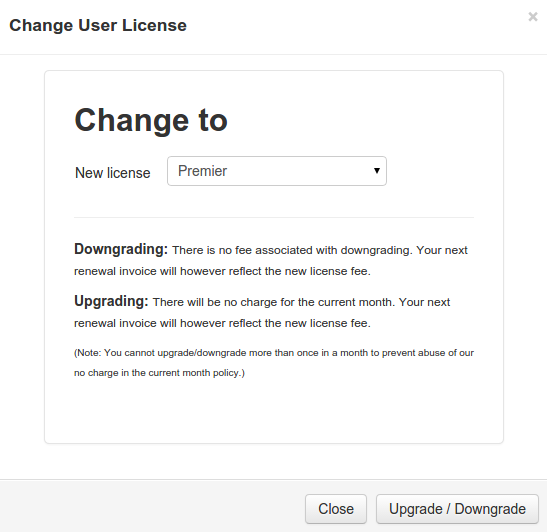
User licenses run on a monthly basis. It is also possible to upgrade or downgrade your license at any time. Please note that only account holder users can change license. To change your current license, go to the User Manager and select Upgrade/Downgrade License option from the Action button. Select the new license option. |
|
Sms Concatenation
|
Sms's are text messages sent to a mobile device with a mximum of 160 characters. It is possible to send sms's longer than 160 characters using sms concatenation. Longer sms's are essentially broken up into into a number of sms's and are charged accordingly as shown below:
|
Sms Blacklisting
|
In compliance with existing regulations, our system will scan all incoming sms for the word STOP. If STOP is found, our system will automatically insert the senders number into our system blacklist. The blacklist entry will be associated with the targeted sms account. The system will then no longer allow sending to the blacklisted number from the associated account. In addition, our system blacklist also includes numbers defined by the Direct Marketing Association of SA. Our system will not allow sending to these numbers. Should one of your clients request that they wish to receive sms's from you, please contact Dev Squared Designs with the origonal request from your client. |
General Sms Templates
|
General Templates are used for Quick Sms and Number List Imports. You do have the option to parse in the Title, Initials, Firstname and Surname if the recipient exists in one of your Contact Databases. If the recipient does not exist, and you are trying to parse in contact data, the sms will be failed. You can edit and re-submit the failed sms from the Failed Report List. When using the Mail Merge or Number List Import functions, click on the Please note that general templates cannot be used when creating Bulk Sms.
|
|
Email to Sms
|
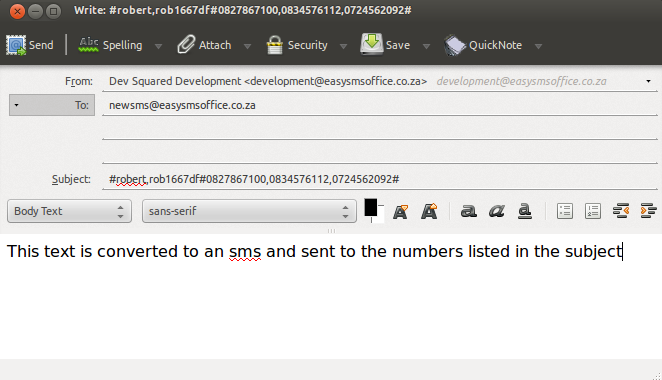
Our server provides an Email to SMS API to allow you to submit sms's by sending an email to our server mailbox newsms@easysmsoffice.co.za. In order for the email to be processed, you need to specify the subject of the email in the following manner: An example email is shown on the right. Please specify the username and password as per your normal site login profile. In order to receive sms's via your email, you can setup a Sms Processor to convert incoming sms's to emails. |
|